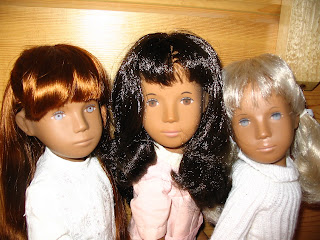
Up until this past year, my stringing was quite loose for a number of years. I could still stand—as long as I was balanced just so... But you could knock me over with a feather any time. Since my arm stringing was just ordinary sewing elastic, MamaT figured she couldn't do too much damage by attempting to replace my arm stringing herself. Then when Patrick arrived with his stringing all strunk, she immediately replaced his leg to head stringing, and next replaced my leg stringing (leaving the original string tucked inside my body). And when Lona arrived, she also needed to be restrung after her odor problem was resolved. MamaT took photos when she restrung Lona and is gradually getting better results from her work, so now I'll share her restringing methods with you.
Now before I go any further, I will recommend that you first consider sending your doll to a “Sasha Spa”. Prices will vary depending on what attention your doll needs, but after doing this on our own, I will say that $20 for a Sasha restringing is VERY reasonable. Below are links to a few different people I know of that do Sasha doll restringing and other repairs. If you know of others who should be included in this list, please post a comment.
http://home.comcast.net/~johnson-n-johnson/SASHA.html
http://www.oursashadolls.com/order.html
http://www.sashadoll.com/repair/repair.html
http://www.sashahospital.org.uk/
However, for the die-hard do-it-yourselfer, here are a few tips on restringing a Sasha doll. I expect there is more than one way to do this, and I can't gaurantee this is the best way, but it is a way we've found that works for us.
1). The Big Picture. First, you need to understand how a Sasha doll is strung. One loop of string holds the arms together. A second loop is connected to both legs and the head, as crudely shown in the diagram below. This is for an older doll. Post-1975 dolls have a ring/neck assembly, we'll address later. When you do measurements later, you will be figuring the size of loop needed between these hooks when all the limbs/head are in place.

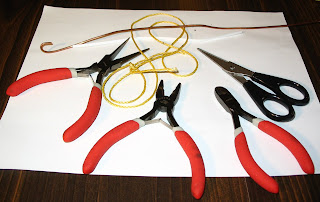
2). Tools. Next you will need tools for the job. These include:
>Round elastic cord, at least 1/8” thick, but 3/16 or 1/4” would be better if you can find it.
>Metal tubing that just fits the width of your elastic (can be found at hobby stores). Kelly of "OurSashaDolls.com" above reminded me to point out to be sure not to use rust-prone metals, like steel. I used brass tubing, but copper tubing would also be okay. These oxidize, but they don't rust, and they only corrode in a very wet environment. My elastic loops look like hair bands, but the metal connectors on hairbands are made from steel and will rust. Kelly says there are hairbands available that do not have metal connectors, but I don't know if they come in the right size for Sasha restringing or not.
>Superglue
>String
>Scissors
>Long hook – Ours was made from 12 gage copper wire
>Needlenose pliers (2 pair if possible)
>If you are working with a ring assembly, you will need a small hook similar to those found on the legs and arms of your doll. Like these hooks, it should have a hook on both ends to hook on both the ring and the elastic string. You might also need cutting pliers or a wire cutter if you are making your own hook out of copper wire like we did. It needs to be very sturdy metal.
3). Measurements. Hold your elastic against a ruler and measure the maximum a given length of it will stretch. Most of the elastic we've seen will double in length, but you should check your specific material. Use a string (non-stretch) and whatever ingenuity you've got to figure out the size of loop you need between the hooks when the doll is all together. This part is tricky and hard to explain. The measurement you are looking for will probably make more sense once you've read through all the instructions, so do that first. Your first measurement is the size you would have if there were no stretch in your elastic. If you have elastic that can double in length at its maximum stretch, the size of loop you really need should be 75% of the loop you measured without any stretch. The elastic should be stretched to about half its capacity when the doll is in normal position. If the string is not stretched enough, your doll will be too loose. If it is stretched too tight, the stringing will wear out too fast, or worse yet, it could damage the shape of your doll. Once you've figured out the size of loop you need, you can cut the elastic to size. The amount of material you use will be surprisingly small. If your elastic is on the thin side, you may want to double the size of your loop and then loop the elastic around your hooks twice for a little extra strength if that makes sense. Just ignore the last sentence if it doesn't make sense.
4). Elastic Loops. When you have the right length of elastic, slip both ends into either side of a short piece of metal tubing that matches the width of your elastic. Put a drop or so of superglue at the mouth of the tube on each end. The glue should wick down the elastic inside the tube aways. While superglue dries quickly, you should let it dry several hours or overnight before stretching your elastic again, so it will be good and set before you put pressure on it. Other methods we tried included tieing the string in a knot. Getting the right size loop was even harder with this method, and the knot always seemed to slip and not stay in the same place, so we gave this method up. We also tried crimping the metal tubing onto the elastic. This worked sometimes, but not all the time, and ends up wasting a lot of tubing with failed attempts. The superglue technique worked consistently for us, so we like that method.
5). Leg to head restringing. If you are replacing both leg and arm stringing, do the legs first as they are more difficult. If your doll has a ring neck assembly, you need to hook a double ended hook on the ring (see photo). Hopefully, you read all instructions before you begin, because I'll remind you here that you need to measure your loop from the end of this hook and not from the ring when you are doing your measurements. In most cases the original stringing will still be on the ring and will just hang loose inside the body when you're done. Since this doll had smoke issues, the stringing is being stored separately from the doll.
Now hook either end of your leg loop on the hooks on your doll's legs (see photo). If your doll is missing a hook, you can buy a similar hook or make one from sturdy wire. If an end of the hook is closed too tightly to get string on or off it, it may take 2 pair of pliers or maybe a vice clamp and some pliers to adjust the hook opening so you can remove the old string and hook on the new. DH's can be helpful here too. Put your long hook down through the neck of the doll and grab the elastic with the hook. Make sure you have both sides of the elastic so you will have a double elastic in your hook as shown in the photo, and not just one side of the elastic.
The next step is a two person job, so find an assistant. One person will need to pull the elastic up to the neck of the doll with the hook. This will be at its maximum stretch. The second person should attach the head hook to the string. When the head is hooked on, you can unhook the long hook and let the head pull into place. Needlenose pliers can come in handy for helping get the elastic on and off the hooks as needed. The legs and head should all be snugly attached now.
6). Arm restringing. If you also need to attach arms, now hook your arm loop to the hook on one arm. Put your long hook through the opposite armhole and grab the other end of your elastic loop. Pull the elastic through and hook the second arm on this end. Unhook your long hook and let the arms pull into place. Now you should have a doll that can stand and hold his/her arms up. Voila! Try setting one foot flat, and the second foot on its toe and balance the doll. Sasha's can do this. Pretty cool, eh?


We've gotten a little better at this with each doll we've restrung. It does take some practice to get just the right tension you want. Most of us restrung dolls are still slightly on the loose side (which is better than being too tightly strung), but we can hold any pose we want now, so we're happy with that. I can even balance on a slanted log now (see Sasha's Summer Adventure entry), which I never could have done a year ago. So I will tell you from a personal experience--A properly strung Sasha is a happy Sasha. Hope you have good luck with yours!


